
Being an artist in today’s world, means that most of us need digital images for submissions, or what have you, online. I recently came across another artist struggling to create digital images, and I remembered how I struggled as well.
A lot of artists use a camera, and that is fine too, but I favor a scanner. It really creates a nice image, so nice that I am able to submit my art to a licensing company and have it published. So you can be reassured that I have experience with digital images.
First off, I scan all my images on a Canon Scanner Mark 3000. I shopped around to try to get a scanner with the largest screen, knowing my paintings are not document size. That is not an easy thing to find, especially within a budget. I settled on the Canon scanner, and have honestly been thrilled with it. It works great!!! (I do not have the large screen, so that is why I learned to “stitch” them together)
First you need to scan your painting. I have seen artists take the top of the scanner, build a light box, and scan their art. Genius! But you need the room to do this, and also the correct scanner. My scanner does not work without the top, so this was not an option for me.
- Hook scanner up and place dried painting face down on the scanner. Wet paintings give a glare from the shine of being wet, and do not scan well. How do I know? Lots of experience…… If your scanner has a cover, its not going to close all the way because of the painting. So you will need to get something to cover the whole setup. Otherwise you end up with scans that have different lighting. Please see pic of my scanning setup.

The above pic shows painting face down on scanner. Lid will not close, so you need to put something over scanner and painting.
 I use an old, dark tablecloth to cover mine. I had to put something heavy on painting to hold it in place, so I grabbed what was handy, which was the vase you see in photo.
2. When scanning painting, you have to do sections at a time, so try to notice what area you have done. Overlapping is a good thing. And make sure the painting is lined up nicely to edges of scanner. If it is crooked, it will be a nightmare later stitching them together. I use the software that came with my scanner. There are usually a few settings, so you may have to play with them a bit, to get an image that looks like your art. Sometimes the colors can be off, so please get these settings correct before scanning, it will save you a lot of heartbreak.
3. Once they are all scanned, open Adobe Photoshop. I use Elements, as this software can get a bit pricey, and elements has all of what I need. Once photoshop is open, please go to File—–New—-Blank File. This is what I put in:

I make a large file, so it all fits. I later crop it to a smaller size. This may not work for everyone, I am not a teacher, just an artist sharing my knowledge.
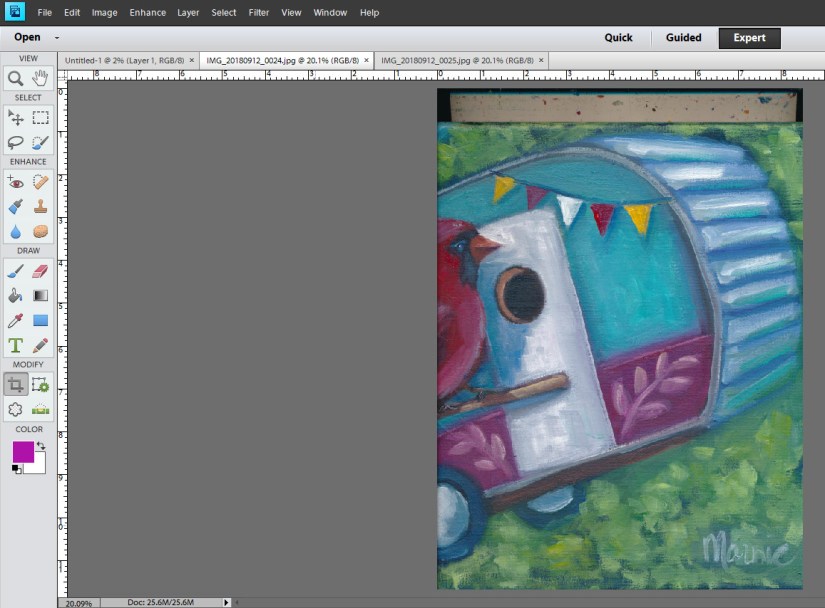
So, as you see from image above, I have my two scanned images open, as well as the file I am going to paste them into. Here is where you would rotate the file if needed, so it comes in correctly when pasted into new document. If you notice, at the top of my image there is a white area with paint spots. All the times I was not patient, and painting was wet, left paint on scanner. Don’t worry about the edges being off at this point, we will crop image later.
4. Now that files are open, go into one of the image files and hit Select—–All. You should see the image border get highlighted with a dashed line. Then go to Edit——Copy. What you have done is copied image to be inserted.
5. Now toggle over to Untitled, or the document that you created in the first steps. Hit Edit—–Paste. The image will be in your document. Do the same for all the images that you have scanned. Copy and paste them into your document. When you are done, it will look like you have only one image, as they usually insert into the same spot as the first.
 6. Above is what your screen should look like. This is where I now crop a bit so I do not have such a large image to work with. Go to the crop tool, and click on it, then go around the images.

 Once the file is cropped, and smaller, now is a good time to save the file. Go to File—–save as—- and save it.
7. Next I use the “move” tool to move the images off one another.

8. Once you can see them both, I then click on one of them in the layer section, and make it transparent. 60 -70% is usually a good percentage.

9. The next part is to zoom in, so you can see the brush strokes. Once they are close sometimes Adobe will do it for you. I like to make sure, and zoom in very tight, and do it myself. See how well they are fitting?
 10. Next thing is to go back to layer, and put transparency back to 100. Once that is done, you will see there is a definitive line. See it circled?
  11. To get rid of that line we are going to use the select command. On the bottom of the screen you will see there is a feather option. You MUST change this to 23 or so. This softens the edges, and will make that edge go away.


12. Once you put 23 in, go to the image and select along that line as shown.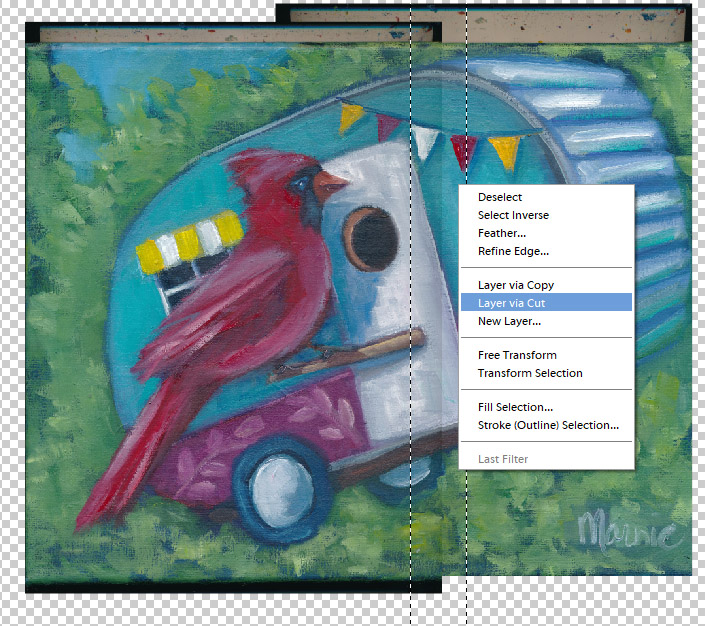
13. Right click with your mouse after creating selection, to get the pop up menu. Hit Layer Via cut. Go the layer you made, and right click. Delete it. The line will disappear.
14. Merge your layers so you have one layer. (Right click on layer)
15. Save image as jpeg. Next you should edit the image for brightness, color, and fix any other imperfections. Then save again. Voila! You have created a stitched together image!
Good luck!

